

← November Engineering Retrospective
I made significant progress through the past month. A multi-regional tailnet has been built out successfully, and I finally understood the Tailscale ACL policy and hardened it. Found a critical security vulnerability on my Paris node: Docker containers bypassed UFW and exposed my Pi-hole as a public resolver.
This blog is too difficult for some of my readers, as it has a huge gap from last blog. If you don't know what is tailscale, [Check this out](/blog/2025-10-09-tailscale#tailscale-intro)
- Tailnet
- Container bypassed ufw
- What do I host in my tailnet?
- Minecraft server self hosting
- Review on proxy solutions
- Set up shadowsocks
- Ending
Tailnet
Tailscale is one of the best choices to build a secure mesh network, connecting all devices together. Access Control is a central topic if we are to manage many devices and users. On this year’s Black Friday, I bought a VPS at Hostinger with 4GB of RAM, then I decided to run it as a Minecraft server, and play with my friends. Now I finally have to face Access Control in my tailnet. I don’t want to expose my server on public internet, so Tailscale is the best choice, and also I don’t want any of my friends hacking around devices in it. Thus, I am changing my ACL.
What my ACL looked like before:
{
  "src": ["*"],

  "dst": ["*"],

  "ip": ["*"]
}
which essentially grants everyone access to any devices. This works perfectly fine with a small number of users. But, I can imagine my friends posing thousands of pings to my computer just for fun. That is not acceptable, I changed my ACL to something like:
{
  "src": ["autogroup:members"],

  "dst": [
    "tag:gpt",
    "tag:hkust",
    "tag:relays",
    "tag:server",
    "tag:service-member",
    "autogroup:internet"
  ],

  "ip": ["*"]
}
This version seems to work but I tried it and got stuck on it. This was given by an LLM. I should never trust it in the first place. What this means is granting all members access to devices with some tags, and use of exit-node. The problem is Tailscale ACL is deny on default, I am the owner of the tailnet, owner is a member, but without explicitly allowing owner to access, an owner or in this case admins are not granted with access. With final fine tuning, I get:
{
  "grants": [
    {
      // All members can use peer relays (tag:relays)
      // as Tailscale Peer Relays
      "src": ["autogroup:members"],

      "dst": ["tag:relays"],
      "app": { "tailscale.com/cap/relay": [] }
    },
    // Members
    {
      "src": ["*"],

      "dst": [
        "tag:gpt",
        "tag:hkust",
        "tag:relays",
        "tag:server",
        "tag:service-member",
        "autogroup:internet"
      ],

      "ip": ["*"]
    },
    // Admins
    {
      "src": [
        "autogroup:admin",
        "autogroup:it-admin",
        "autogroup:network-admin",
        "autogroup:billing-admin",
        "autogroup:auditor"
      ],

      "dst": [
        "autogroup:members",
        "autogroup:internet",
        "autogroup:self",
        "tag:service-admin"
      ],

      "ip": ["*"]
    },
    // Owner
    {
      "src": ["autogroup:owner"],
      "dst": ["*"],
      "ip": ["*"]
    },
    {
      "src": ["autogroup:tagged"],

      "dst": [
        "tag:service-member",
        "tag:gpt",
        "tag:hkust",
        "tag:relays",
        "tag:server"
      ],

      "ip": ["*"]
    }
  ]
}
Explicit and strict.
Container bypassed ufw
Docker containers are a level above UFW, which means UFW cannot block public requests to my Pi-hole container.
External Client
|
| DNS query UDP/TCP 53
v
+----------------+
| Host Public IP |
+----------------+
|
v
+-------------------------------+
| Debian VPS / Linux Kernel |
+-------------------------------+
|
| forwarded into Docker NAT path
v
+-------------------------------+
| Docker iptables / DNAT |
| -> 172.18.0.x:53 |
+-------------------------------+
|
v
+-------------------------------+
| Pi-hole container |
| listens on port 53 |
+-------------------------------+
|
| DNS reply
v
External Client
[ UFW default deny exists on host input side, but this traffic is
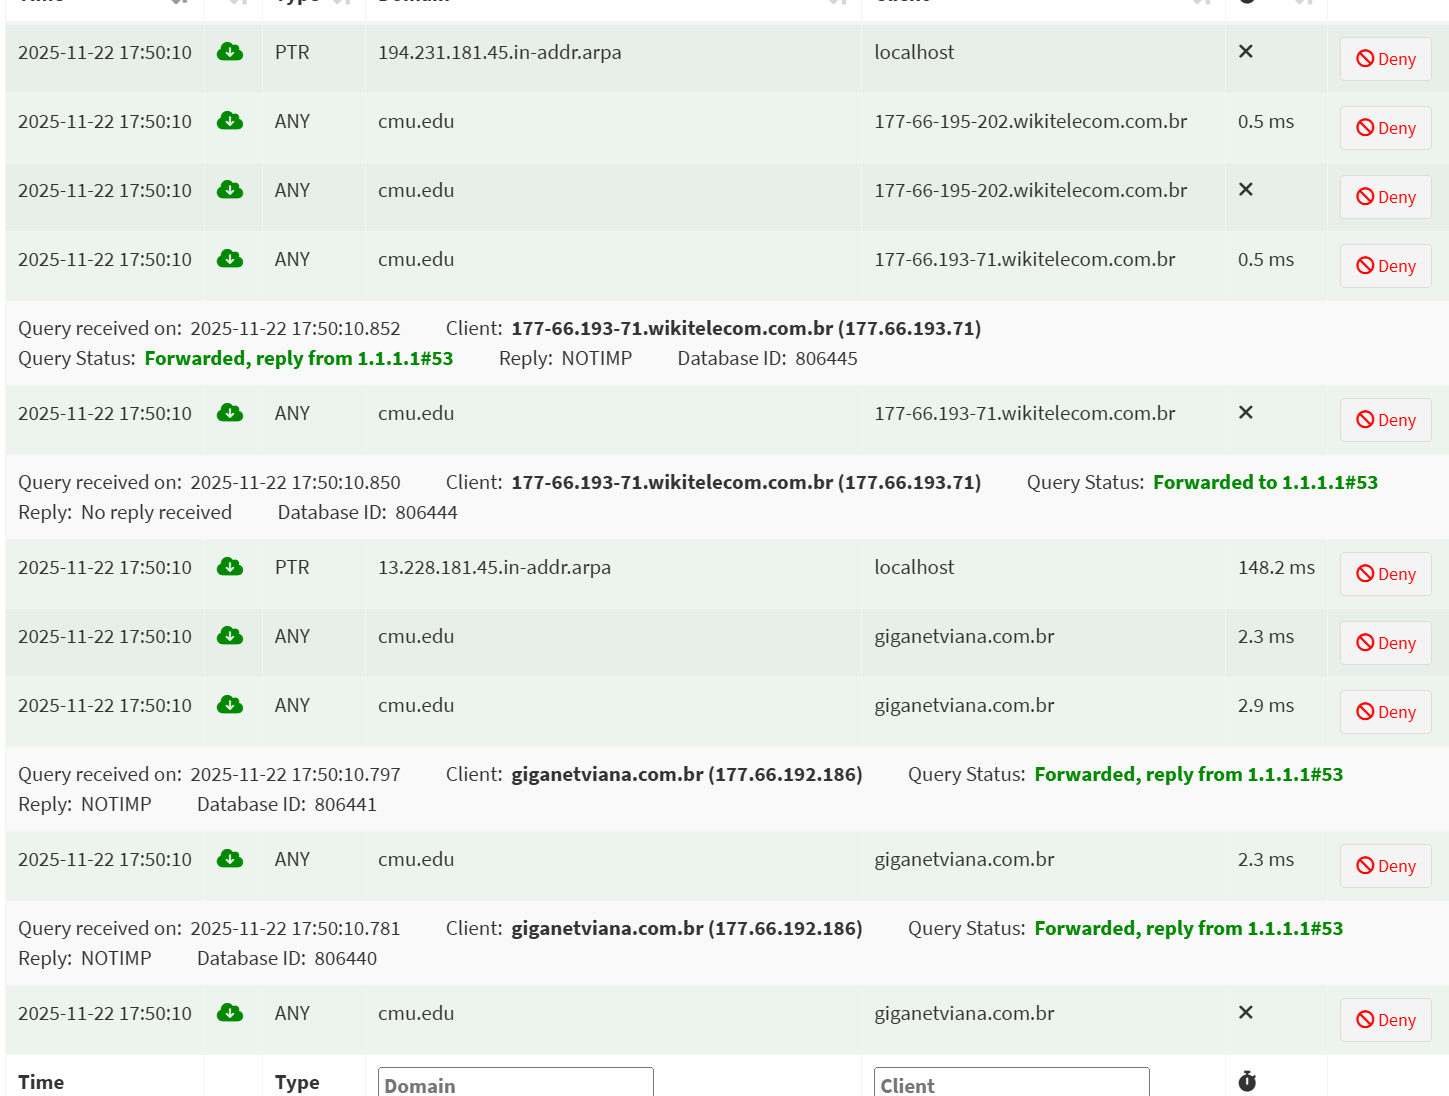
illustrated as reaching Docker's NAT path instead of stopping there ]This made my Pi-hole a public container, once I went to check the admin panel of my Pi-hole, there are about 1700 active clients using my resolver. Lots of them are from Brazil.
How did I solve it? I used a firewall, not UFW. The firewall provided by Hostinger, it is at a bigger scope and drops requests from the outside world.
What do I host in my tailnet?
Self-hosting is so much fun. And you hold your own data.
- Pi-hole A super lightweight DNS resolver, block ads in the tailnet. Takes about 30Mb with container.
- Karakeep Bookmark everything, with AI scraping support. Most platforms support it.
- Uptime-Kuma Fancy monitoring tool for self hosting. Notify you if your service is down.
- SearXNG A privacy first search engine. I use it along the Min Browser, Min browser has a built-in support of SOCK5 protocol, which is perfect.
- Minecraft server self hosting, Read more
- Proxy server self hosting, Read more
- Nextcloud
Minecraft server self hosting
I am using a Minecraft server container to help me easily set up the server. Source
I have not dived into the server configuration yet. I just set it up and today is Friday, I am going to test it out with my friend during weekends. Hope the server will survive under 2GB Ram.
The above solution requires more RAM and performance. The server is in Java, I suspect its efficiency. Yesterday, I found a community Minecraft server, source. The link is the repo that I forked, I added Docker support for it, save you more time. The drawback is that it only supports old versions of Minecraft, 1.12.*.
docker build -t cuberite .Build the imagedocker run -d -p 25565:25565 -p 8080:8080 -v ./cuberite-data:/server --name cuberite cuberiteRun the container. The server is at port 25565 and admin panel at 8080. Modifywebadmin.inifile to create an admin account and restart the container.
Minimalist
Minimal MC server, I wrote a Dockerfile along with a start shell script. Place your downloaded server.jar under that directory and build the images, and you will have a running mc server!
Setting up my own proxies
Geo Block is one of the most annoying things in the world. How to solve it? Use a proxy. Buy your own VPS and self host a proxy server can actually have many benefits:
- You manage the server, data is in your hands
- No one is competing with you, get the whole bandwidth
- Can be cheaper than buying a proxy provider
- Secure browsing under unsafe networks
Through the last few months, I’ve been researching on proxies and VPNs. The most straightforward choice is WireGuard.
WireGuard® is an extremely simple yet fast and modern VPN that utilizes state-of-the-art cryptography.
“Can I just once again state my love for it and hope it gets merged soon? Maybe the code isn’t perfect, but I’ve skimmed it, and compared to the horrors that are OpenVPN and IPsec, it’s a work of art.” Linus
I would say the best way to use it is through Tailscale, fast, lightweight and most importantly, a mesh! This entire blog could not be done without Tailscale.
But at what cost? Typical BBC ending
WireGuard’s aim is simplicity and speed. It can be easily fingerprinted, under some firewall circumstances, it will be blocked or unstable.
I then went on further, deeper research. Later I found another tool: AmneziaWG, can avoid DPI inspection, while retaining the speed of WireGuard. But the installation is a little complicated on a self-hosted Linux machine, which I modified a script, Source, a fork from Varkin’s script. In 2025, the apt source list of Amnezia, I haven’t dived into that. But the installation script would fail for newer Linux kernel. (You can find it in the issues) That’s the motivation for modifying the script. It does not involve kernel modules, all lives under userspace. It builds the official go source code and installs it. Again, make life easier.
What I also tried
I also tried V2Ray, Hysteria and Shadowsocks. V2Ray and Hysteria seems to have many active users, but the setting up is rather complicated, or like Hysteria, very hard to find cross platform client GUI binaries. I want to mention as well, all of them cannot achieve the speed as WireGuard and AmneziaWG.
Among them, I recommend Shadowsocks first. It has well maintained client applications for Android, Windows, Apple ecosystem. Source Shadowsocks rust is safe and very memory efficient.
zihao@paris:~$ systemctl status shadowsocks
● shadowsocks.service - Shadowsocks-Rust Server
     Loaded: loaded (/etc/systemd/system/shadowsocks.service; enabled; preset: enabled)
     Active: active (running) since Tue 2025-11-25 06:57:32 UTC; 3 days ago
 Invocation: c940ef97e54b45afb70755d7f219116b
   Main PID: 411417 (ssserver)
      Tasks: 3 (limit: 4647)
     Memory: 3.5M (peak: 5.3M)
        CPU: 795ms
     CGroup: /system.slice/shadowsocks.service
             └─411417 /usr/bin/ssserver -c /etc/shadowsocks/config.json
See the Shadowsocks server in Rust, is a memory saver. When running a wifi speed test on my device, the memory would only increase to around 10Mb.
How to set it up?
- Clone the repo, and run
cargo build --release, use native build flag if possible, it can achieve better performance in crypto. - In
./target/releaseyou can find thessserverbinary, move this to your VPS. If you build it directly on your VPS ignore this. - In
/etc/systemd/system/create a service, like this:
zihao@paris:/etc/systemd/system$ cat shadowsocks.service
[Unit]
Description=Shadowsocks-Rust Server
After=network-online.target
Wants=network-online.target

[Service]
Type=simple
User=nobody
Group=nogroup
ExecStart=/usr/bin/ssserver -c /etc/shadowsocks/config.json
Restart=on-failure
RestartSec=3
LimitNOFILE=51200

[Install]
WantedBy=multi-user.target
Step 4. Then make a directory /etc/shadowsocks/ create a config.json file, like this:
zihao@paris:~$ cat /etc/shadowsocks/config.json
{
  "server": "0.0.0.0",
  "server_port": { Port you want to use },
  "password": "{ strong password }",
  "method": "chacha20-ietf-poly1305"
}
Recommend use openssl rand -base64 30 to generate a strong password
Step 5. Start the service, with:
# Start the service
sudo systemctl enable --now shadowsocks
sudo systemctl start shadowsocks

# Health check
sudo systemctl status shadowsocks
sudo journalctl -u shadowsocks
Step 6. Configure on your client side. You may find the client app in shadowsocks repo.
At Last
I learned a lot during November. Also learned a lot this term. Nov 28, Friday should be the last of the fall term. I’m writing this up to conclude my fall term at 2025.
- I know how to use Linux
- Learned how to use Tailscale
- Learned many infrastructure set up experience
- Learning Rust right now
What I also enjoyed:
- Stranger Things
- Wednesday
- La casa de papel
- La casa de papel: Berlin
- Designated Survivor
Maybe I should write a review blog about all these shows. I should remove these AI driven blog posts(: Those are in such low quality.
I got a new domain zihaofu245.cloud, don’t know what to serve yet. Open for ideas.
This blog is all written by me, no LLM involved.